Kubernetes Multi-Node Cluster on Raspberry Pi 4
Overview
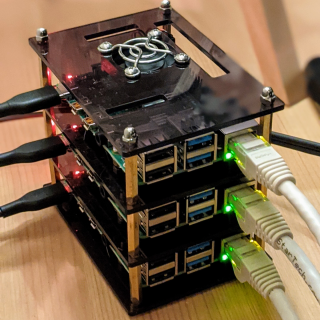
In this article we'll setup a 3 nodes Kubernetes Cluster running on 3 Raspberry Pi 4B boards.
 I chose the 4 GB model even though, according to Kubernetes Docs, 2 GB or RAM should be enough.
If You are interested in building your own Cluster, here is the list of components I used:
- 3X Raspberry Pi 4 Modell B 4GB
- 3X Kingston microSD Card 32 GB
- 3X 0.5 m Cat6 Patch Short Ethernet Cable
- 1X Anker PowerLine USB C to USB 3.0 Cable, 3 Pack
- 1X Pi Rack Case for Raspberry Pi
- 1X USB Charger RAVPower 60W 12A
Step 1 - Creating the MicroSD
From https://www.raspberrypi.org/software/ download Raspberry Pi Imager
- Plug the MicroSD Card into you computer and launch Raspberry Pi Imager:
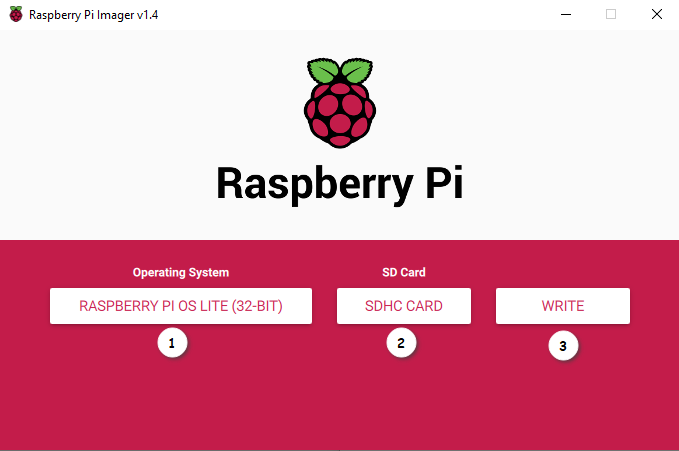
- Select the OS "Raspberry Pi OS Lite" because it has no GUI
- Select your MicroSD Card
- Write the OS onto the MicroSD
Enabling ssh
Since your Raspberry Pis don't have a GUI, we'll manage them over SSH. In order to do that, we'll have to create a ssh file in the /boot partition.
- In Windows explorer, select the letter assiciated to your MicroSD, In my case
D: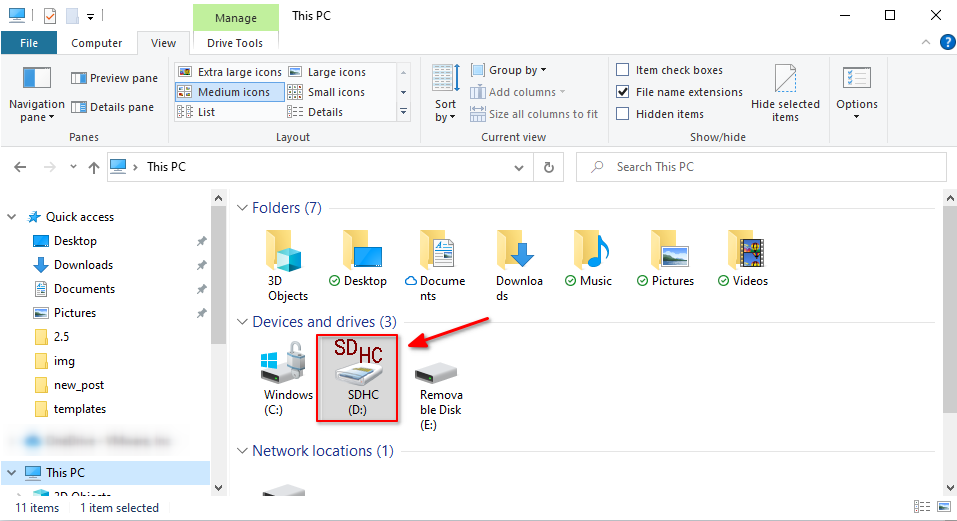
- Inside the folder, create a new empty txt file. Name it ssh, without extension.
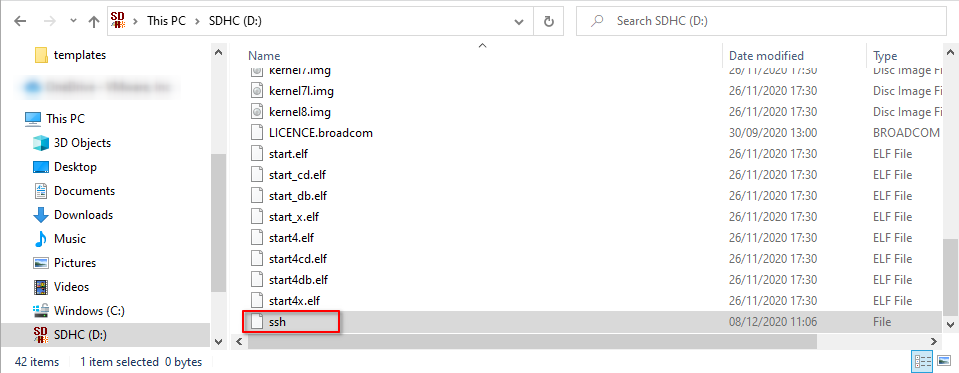 This will instruct the Raspberry OS to enable and start the ssh service at boot.
Step 2 - Booting the Pis and setting hostname and IP
- From your home router DHCP devices list, you should be able to see you Raspberry Pi IP
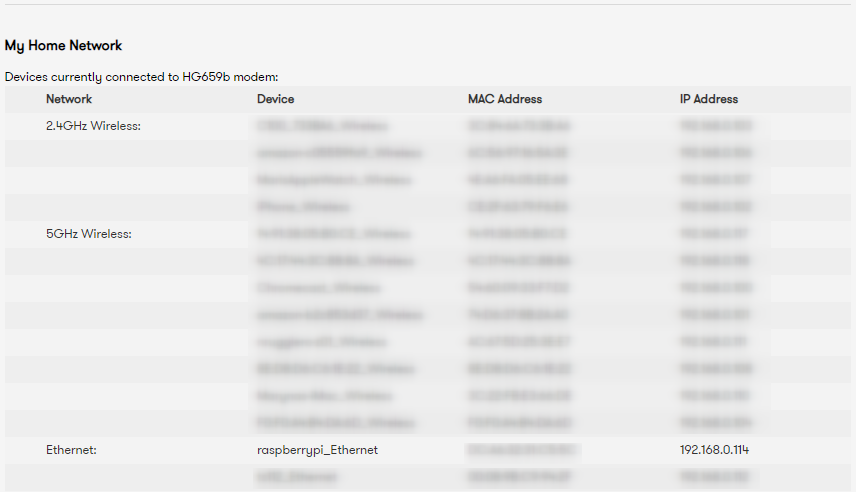 in my case, the name is
 raspberrypi_Ethernetand the ip192.168.0.114. - Now SSH into you Pi and set the hostname. The default username is
piand default password israspberry: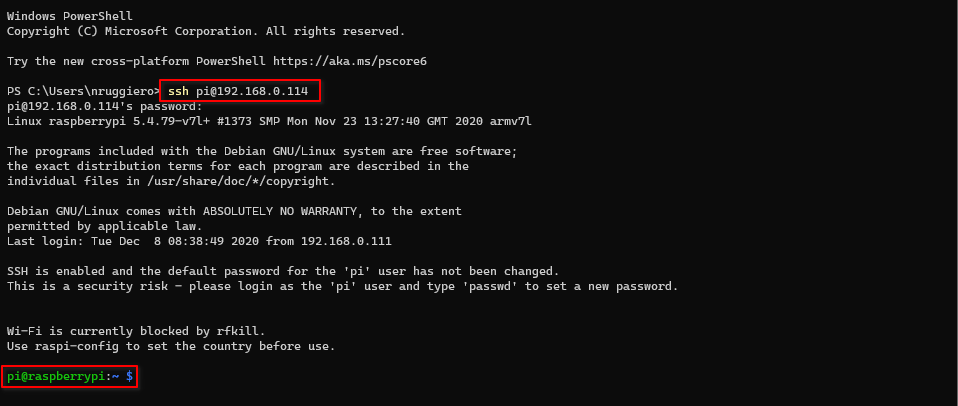 Using an editor of your choice edit
 /etc/hostnameand/etc/hostswith your choosen name: You could also use sed to replace the original hostname with the new one:
1$ sudo sed -i 's/raspberrypi/itdd-k8s-worker-2/' /etc/hosts /etc/hostname - [Optional] In my case I've also decided to create a DCHP reservation, so that I'll always know what IP assigned to what device:
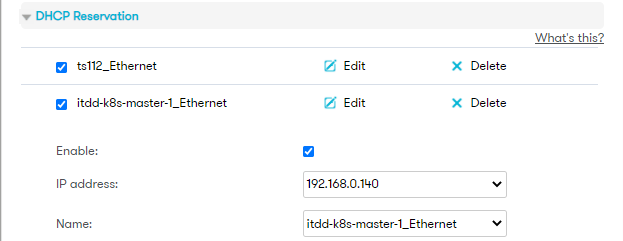
- Proceed in the same way for the remaining nodes. in my case I'll setup 3 nodes:
- itdd-k8s-master-1, IP 192.168.0.140
- itdd-k8s-worker-1, IP 192.168.0.151
- itdd-k8s-worker-2, IP 192.168.0.152
- If everything worked fine, you should have your k8s nodes up and running:

Step 3 - Software installation
The following commands have to be exected on all the nodes
Updating the OS
- Upgrade the system:
1sudo apt update && sudo apt upgrade -y - Add the following options to
/boot/cmndline.txt:So that the file should look like this:1cgroup_enable=cpuset cgroup_memory=1 cgroup_enable=memory1$ cat /boot/cmdline.txt 2console=serial0,115200 console=tty1 root=PARTUUID=f8890bb1-02 rootfstype=ext4 elevator=deadline fsck.repair=yes rootwait cgroup_enable=cpuset cgroup_memory=1 cgroup_enable=memory - Uninstall and disable swap:
1$ sudo dphys-swapfile swapoff 2$ sudo dphys-swapfile uninstall 3$ sudo apt purge -y dphys-swapfile - Reboot the nodes:
1$ sudo reboot
Docker installation
- Install Docker and add your user to the docker group
1$ curl -sSL get.docker.com | sh
2$ sudo usermod -aG docker pi
In the above, "
curl -sSL get.docker.com | sh", be careful when you pipe acurlorwgetcommand intosh, since you don't have control on what is actually been executed on your server. Only do it if you trust the source, or alternatively, download the script first and have a look at it before executing it.
-
Logout and log back in
-
As the root user create the file
/etc/docker/daemon.jsonwith the following content:1{ 2"exec-opts": ["native.cgroupdriver=systemd"], 3"log-driver": "json-file", 4"log-opts": { "max-size": "100m" }, 5"storage-driver": "overlay2" 6}1$ sudo su - 2$ cat << EOF > /etc/docker/daemon.json 3{ 4"exec-opts": ["native.cgroupdriver=systemd"], 5"log-driver": "json-file", 6"log-opts": { "max-size": "100m" }, 7"storage-driver": "overlay2" 8} 9EOF 10$ exit -
Create a directory for the control files:
1$ sudo mkdir -p /etc/systemd/system/docker.service.d
Kubernets installation
- First, import the GPG key, like we did for the Docker repository:
$ curl -s https://packages.cloud.google.com/apt/doc/apt-key.gpg | sudo apt-key add - - Add kubernetes repositiry:
And add the following line to the file:
1$ sudo vim /etc/apt/sources.list.d/kubernetes.list1deb http://apt.kubernetes.io/ kubernetes-xenial main - Install required Kubernetes packages
1$ sudo apt update
2$ sudo apt install -y kubeadm kubectl kubelet
Step 4 - Configuring k8s Cluster
Initialize the k8s Cluster
Only on the Master node:
- Initialize the Cluster
1sudo kubeadm init --pod-network-cidr=10.244.0.0/16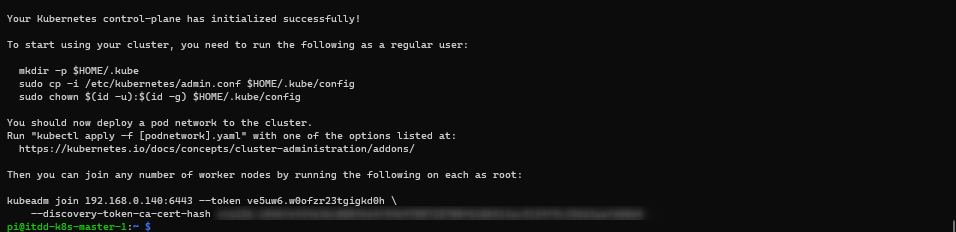
- run the following as a regular user:
1mkdir -p $HOME/.kube
2sudo cp -i /etc/kubernetes/admin.conf $HOME/.kube/config
3sudo chown $(id -u):$(id -g) $HOME/.kube/config
Deploy flannel as the CNI
In order to provide networking capabilities among the nodes, we need to deploy a Container Network Interface (CNI). There are many different options to choose from. For this instance, we are going to use one of the most common: Flannel
1kubectl apply -f https://raw.githubusercontent.com/coreos/flannel/master/Documentation/kube-flannel.yml
Validate the Cluster functionality
- Validate all pods in the kube-system namespace are up and running:
kubectl get pod --all-namespacesorkubectl get pod -n kube-system:
Join the Worker Nodes to the Master
Recall the join command generated from the kubeadm init command and run it on each and every node as sudo:

Verify the installation from the master node
You can run kubectl get nodes to get a list of the nodes and their status:

You can also add -o wide to the command to get more information:

You can also query the status of the kube-system pods as following:

And that concludes this article on how to install and configure a 3 nodes Kubernetes Cluster on Raspberry Pi.
See Also
comments powered by Disqus