Kubernetes Multi-Node Cluster with Multipass
Overview
In this short article I will explain how to create a 3 nodes Kubernetes cluster on your Mac leveraging Multipass.
"Multipass provides a command line interface to launch, manage and generally fiddle about with instances of Linux. The downloading of a minty-fresh image takes a matter of seconds, and within minutes a VM can be up and running."
The Register
Deploying the 3 Kubernetes nodes via Multipass
Let's list what images are available to deploy:
1multipass find

For my Kubernetes Cluster I'll deploy 3 nodes (One master node and two workers) using Ubuntu 18.04 LTS as follows:
- name: k8s-master-1
- CPU: 2
- Disk: 32 Gb
- Memory: 2 Gb
- image: 18.04
1multipass launch -c 2 -d 32G -m 2G -n k8s-master-1 18.04
- name: k8s-worker-1
- CPU: 2
- Disk: 32 Gb
- Memory: 2 Gb
- image: 18.04
1multipass launch -c 2 -d 32G -m 2G -n k8s-worker-1 18.04
- name: k8s-worker-2
- CPU: 2
- Disk: 32 Gb
- Memory: 2 Gb
- image: 18.04
1multipass launch -c 2 -d 32G -m 2G -n k8s-controller-2 18.04
A multipass list will reveal whether the 3 instances have been deployed and what's their state:

Multipass tweaks
If you run Multipass on a Mac, the default virtualization engine in use is hyperkit. You can verify this setting with the following command:
1sudo multipass get local.driver
If you decide to use VirtualBox for example, you'll need to change the above setting like so:
1sudo multipass set local.driver=virtualbox
Hyperkit provides a preconfigured fixed network for your VMs (192.168.64.0/24) and assigns IPs and DNS using the integrated network framework.
Two problems I faced with this approach are:
- You can't assign IP addresses of your choice
- Many VPN, Firewall and Security softwares are known to interfere with the default DNS server 127.0.0.53 assigned to the VMs, preventing them to connect to the Internet.
For the first problem, the solution I found is to create DHCP reservations, manually editing the file /var/db/dhcpd_leases:
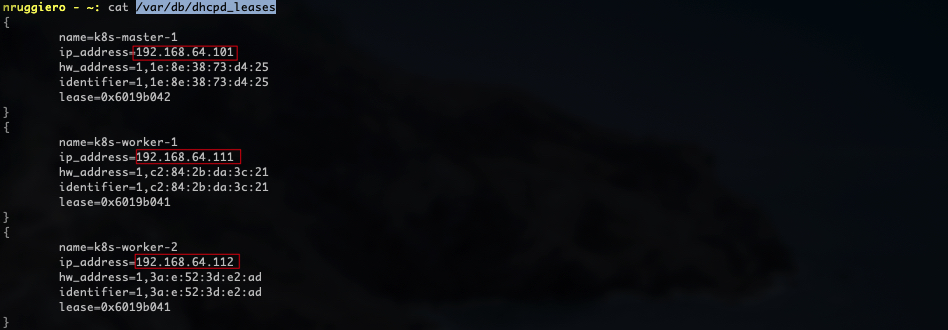
Remember to stop all the running instances (
multipass stop --all) and restart the multipass daemon (sudo launchctl stop com.canonical.multipass) in order for the changes to take effect!
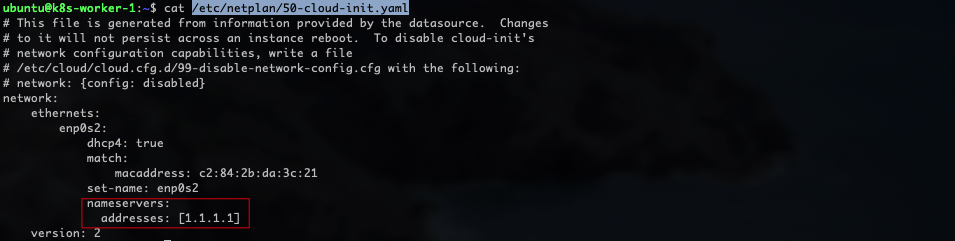
For the second problem, in my case the culprit was the Cisco Umbrella Roaming client installed on my Company's laptop, so I decided to configure a custom DNS server (1.1.1.1) by editing the file /etc/netplan/50-cloud-init.yaml:
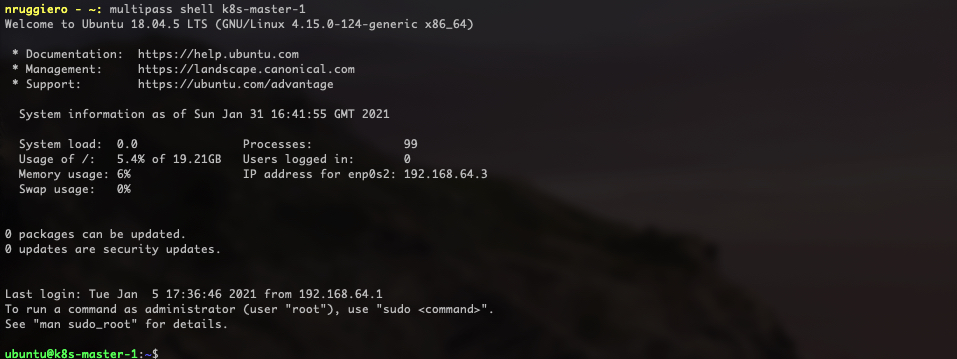
From now on, to access these server's shells, we will use the command
1multipass shell <instance_name>
Installing the CRI
In order to run Containers we need a Container Runtime. For this excercise we'll use Docker.
On each of your nodes, install Docker CE.
 1# (Install Docker CE)
 2## Set up the repository:
 3### Install packages to allow apt to use a repository over HTTPS
 4sudo apt-get update && sudo apt-get install -y apt-transport-https ca-certificates curl software-properties-common gnupg2
 5
 6# Add Docker's official GPG key:
 7curl -fsSL https://download.docker.com/linux/ubuntu/gpg | sudo apt-key --keyring /etc/apt/trusted.gpg.d/docker.gpg add -
 8
 9# Add the Docker apt repository:
10sudo add-apt-repository "deb [arch=amd64] https://download.docker.com/linux/ubuntu $(lsb_release -cs) stable"
11
12# Install Docker CE
13sudo apt-get update && sudo apt-get install -y containerd.io=1.2.13-2 docker-ce=5:19.03.11~3-0~ubuntu-$(lsb_release -cs) docker-ce-cli=5:19.03.11~3-0~ubuntu-$(lsb_release -cs)
14
15## Create /etc/docker
16sudo mkdir /etc/docker
17
18# Set up the Docker daemon
19cat <<EOF | sudo tee /etc/docker/daemon.json
20{
21  "exec-opts": ["native.cgroupdriver=systemd"],
22  "log-driver": "json-file",
23  "log-opts": {
24    "max-size": "100m"
25  },
26  "storage-driver": "overlay2"
27}
28EOF
29
30# Create /etc/systemd/system/docker.service.d
31sudo mkdir -p /etc/systemd/system/docker.service.d
32
33# Restart Docker
34sudo systemctl daemon-reload
35sudo systemctl restart docker
If you want the docker service to start on boot, run the following command:
1sudo systemctl enable docker
From: Kubernetes Official Documentation
Bootstrapping the cluster with kubeadm
Installing kubeadm, kubelet and kubectl
Prerequisites
Make sure that the br_netfilter module is loaded. This can be done by running lsmod | grep br_netfilter. To load it explicitly call sudo modprobe br_netfilter.
As a requirement for iptables to correctly see bridged traffic, you should ensure net.bridge.bridge-nf-call-iptables is set to 1 in your sysctl config, e.g.
1cat <<EOF | sudo tee /etc/modules-load.d/k8s.conf
2br_netfilter
3EOF
4
5cat <<EOF | sudo tee /etc/sysctl.d/k8s.conf
6net.bridge.bridge-nf-call-ip6tables = 1
7net.bridge.bridge-nf-call-iptables = 1
8EOF
9sudo sysctl --system
Packages installation
You will install these packages on all of your machines:
kubeadm: the command to bootstrap the cluster.kubelet: the component that runs on all of the machines in your cluster and does things like starting pods and containers.kubectl: the command line util to talk to your cluster.
Copy/paste one line at a time (except for the cat command. In this case copy from cat to EOF). Press enter after pasting:
1sudo apt-get update && sudo apt-get install -y apt-transport-https curl
2curl -s https://packages.cloud.google.com/apt/doc/apt-key.gpg | sudo apt-key add -
3cat <<EOF | sudo tee /etc/apt/sources.list.d/kubernetes.list
4deb https://apt.kubernetes.io/ kubernetes-xenial main
5EOF
6sudo apt-get update && sudo apt-get install -y kubelet kubeadm kubectl
7
8# To avoid Kubernetes packages to be automatically upgraded from any system upgrade
9sudo apt-mark hold kubelet kubeadm kubectl
Creating the cluster
This is a three step process:
- Initialising the cluster with
kubeadm initon the master nodes - Installing a Pod network add-on (CNI)
- Joining the worker nodes to the Cluster
Step 1 - Initialising the Cluster
Before proceeding, we'll have to consider what CNI plugin we are going to deploy because such decision might influence the pod-network-cidr parameter we'll pass to kubeadm to create the cluster.
For this exercise, for example, we will make use of Calico as our CNI and according to its documentation the default pod network is 192.168.0.0/16 which conflicts with our nodes network 192.168.64.0/24,so in this case, I'll go for 172.22.0.0/16. Only the master node:
1sudo kubeadm init --pod-network-cidr=172.22.0.0/16
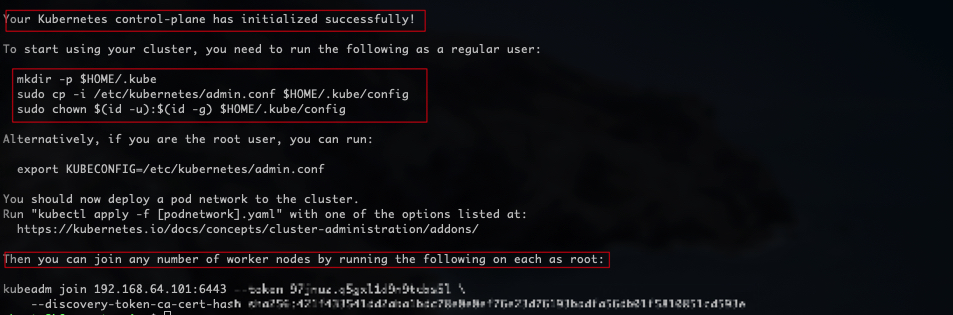
Don't forget to do the following, as a regular user:
1mkdir -p $HOME/.kube
2sudo cp -i /etc/kubernetes/admin.conf $HOME/.kube/config
3sudo chown $(id -u):$(id -g) $HOME/.kube/config
Step 2 - Installing a Pod network add-on
We will follow the instructions from the CNI provider, here.
Pay particular attention, because before creating the CNI pod, we'll need to configure the correct network, as per Step 1.
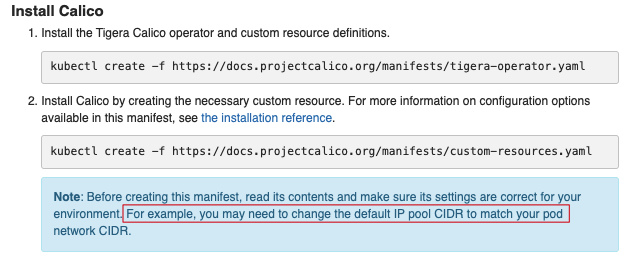 So for Step 2, instead of
 kubectl create -f https://docs.projectcalico.org/manifests/custom-resources.yaml we'll download the yaml file and edit according to our needs, before creating the resource:
1wget https://docs.projectcalico.org/manifests/custom-resources.yaml
2sed -i 's/cidr\: 192.168.0.0\/16/cidr\: 172.22.0.0\/16/g' custom-resources.yaml
3kubectl create -f custom-resources.yaml
Confirm that all of the pods are running with the following command:
1watch kubectl get pods -n calico-system
Wait until each pod has the STATUS of Running.
Step 3 - Joining the worker nodes to the Cluster
On the 2 worker nodes, run the command produced from the kubeadm init output:
1kubeadm join 192.168.64.101:6443 --token <token> \
2    --discovery-token-ca-cert-hash sha256:<discovery-token-ca-cert-hash>
If you forgot to take note of the token, or your token has expired (24-hour TTL), you can generate a new token with the following command:
1$ kubeadm token create --print-join-command
and use the output to join the worker node.
If you followed the instructions carefully you should now have a shiny new 3 nodes Kubernetes cluster and the status of the 3 nodes should be Ready. Try:
1kubectl get nodes

Additionally, check the status of the pods in the kube-system namespace:
1kubectl -n kube-system get pods`

comments powered by Disqus