ownCloud Tutorial Part 1: Install & configure the ownCloud Server
Overview
This quickstart guide is for those who want to quickly install and configure a ownCloud Server. Although there are many different ways to achieve this goal, this document will cover a standard single-server ownCloud installation on CentOS 7.
Install and Configure ownCloud Server
ownCloud offers a variety of installation options:
In this document we will cover a standard single-server installation on CentOS 7.
Prerequisites
- A fresh installation of CentOS 7 with SSH enabled.
- This guide assumes that you are connected as the
rootuser.
Prepare the Server
According to ownCloud documentation the supported environments for best performance, stability, support, and full functionality are:
| Platform | Options |
|---|---|
| Operating Systems (64bit) | - Debian 9 and 10 - Fedora 30 and 31 - Red Hat Enterprise Linux/Centos 7.5 and 8 - SUSE Linux Enterprise Server 12 with SP4 and 15 - Ubuntu 16.04 and 18.04 - openSUSE Leap 42.3 and 15 |
| Database | - MySQL 8+ or MariaDB 10+ (Recommended) - Oracle 11 and 12 - PostgreSQL 9 and 10 - SQLite (Not for production) |
| Web server | Apache 2.4 with prefork and mod_php |
| PHP Runtime | 7.1, 7.2, and 7.3 |
First, make sure the server is up to date:
1yum update -y && yum upgrade
The current installed version should be CentOS Linux release 7.8.2003 (Core).
You can check the version by issuing:
1cat /etc/centos-release
Install and configure the LAMP stack
In this section, we'll be installing the LAMP (Linux, Apache, MySQL, PHP) stack as a prerequisite for ownCloud to function properly.
Enable additional repositories
Enter the following commands in order to install and enable the EPEL (Extra packages for Enterprise Linux) and Remi repositories:
1yum install -y https://dl.fedoraproject.org/pub/epel/epel-release-latest-7.noarch.rpm
2yum install -y http://rpms.remirepo.net/enterprise/remi-release-7.rpm
CentOS 7 ships by default with PHP 5 thus, the Remi repository is needed to retrieve and install PHP 7.
Next, using yum-config-manger, disable remi-php54 and enable remi-php73.
yum-config-manger is provided by the package yum-utils.
1yum install -y yum-utils
2yum-config-manager --disable remi-php54
3yum-config-manager --enable remi-php73
Install Apache Web Server, MySQL(MariaDB) and php
Install the following packages:
1yum install -y httpd php php-mysqlnd php-intl php-dom php-mbstring php-gd php-pdo php-json php-xml php-zip php-gd php-curl php-pecl-mcrypt php-pear unzip mariadb-server mariadb
Enable and start httpd service:
1systemctl enable httpd.service
2systemctl start httpd.service
Configure the Database
In this section, we enable and start the MariaDB service and create a new database and relative user for onwCloud.
Enable and start mariadb service:
1systemctl enable mariadb.service
2systemctl start mariadb.service
Next, configure the security settings for MariaDB issuing mysql_secure_installation. Make sure to chose a strong password:
1Enter current password for root (enter for none):
2Set root password? [Y/n] Y
3Remove anonymous users? [Y/n] Y
4Disallow root login remotely? [Y/n] Y
5Remove test database and access to it? [Y/n] Y
6Reload privilege tables now? [Y/n] Y
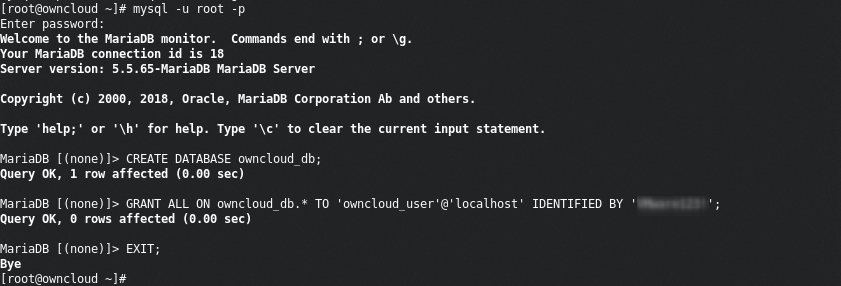
Create DB and user:
Login as root to MariaDB:
1mysql -u root -p
Now it's time to create a database and relative user for ownCloud:
1GRANT ALL ON owncloud_db.* TO 'owncloud_user'@'localhost' IDENTIFIED BY '<YourPassword>';
2FLUSH PRIVILEGES;
3EXIT;
Install onwCloud
This section explains how to install onwCloud Server from the official repository for the CentOS 7 distribution. This is the quickest and easiest method for setting up a single standalone onwCloud server. For large production distributed deployments, the recommended method would be to downloading and installing the tarball version. For more information, please refer to the official ownCloud Documentation.
Add ownCloud repository
ownCloud packages repository is available at the following URL: https://download.owncloud.org/download/repositories/production/owncloud/
Use the below commands in order to enable the repository and install the owncloud-files package.
1rpm --import https://download.owncloud.org/download/repositories/stable/CentOS_7/repodata/repomd.xml.key
2curl -L https://download.owncloud.org/download/repositories/stable/CentOS_7/ce:stable.repo -o /etc/yum.repos.d/ownCloud.repo
Install using yum
1yum clean expire-cache
2yum install -y owncloud-files
Configure permissions
Configure permissions for the apache user: chown -R apache:apache /var/www/html/owncloud/
Configure Firewall and SELinux
Allow http and https traffic towards the server from outside using the firewall-cmd command:
1firewall-cmd --permanent --zone=public --add-service=http
2firewall-cmd --permanent --zone=public --add-service=https
3firewall-cmd --reload
Configure SELinux as follows:
1semanage fcontext -a -t httpd_sys_rw_content_t '/var/www/html/owncloud/data(/.*)?'
2semanage fcontext -a -t httpd_sys_rw_content_t '/var/www/html/owncloud/config(/.*)?'
3semanage fcontext -a -t httpd_sys_rw_content_t '/var/www/html/owncloud/apps(/.*)?'
4semanage fcontext -a -t httpd_sys_rw_content_t '/var/www/html/owncloud/apps-external(/.*)?'
5semanage fcontext -a -t httpd_sys_rw_content_t '/var/www/html/owncloud/.htaccess'
6semanage fcontext -a -t httpd_sys_rw_content_t '/var/www/html/owncloud/.user.ini'
7
8restorecon -Rv '/var/www/html/owncloud/'```
Should you get the error -bash: semanage: command not found, please install the policycoreutils-python package:
1yum install -y policycoreutils-python
The Installation Wizard
When the ownCloud prerequisites are fulfilled and all ownCloud files are installed, the last step to completing the installation is running the Installation Wizard. This involves just four steps:
- Point your web browser to
http://onwcloud_ip/owncloud - Enter your desired administrator’s username and password
- Configure the database
- Click Finish Setup
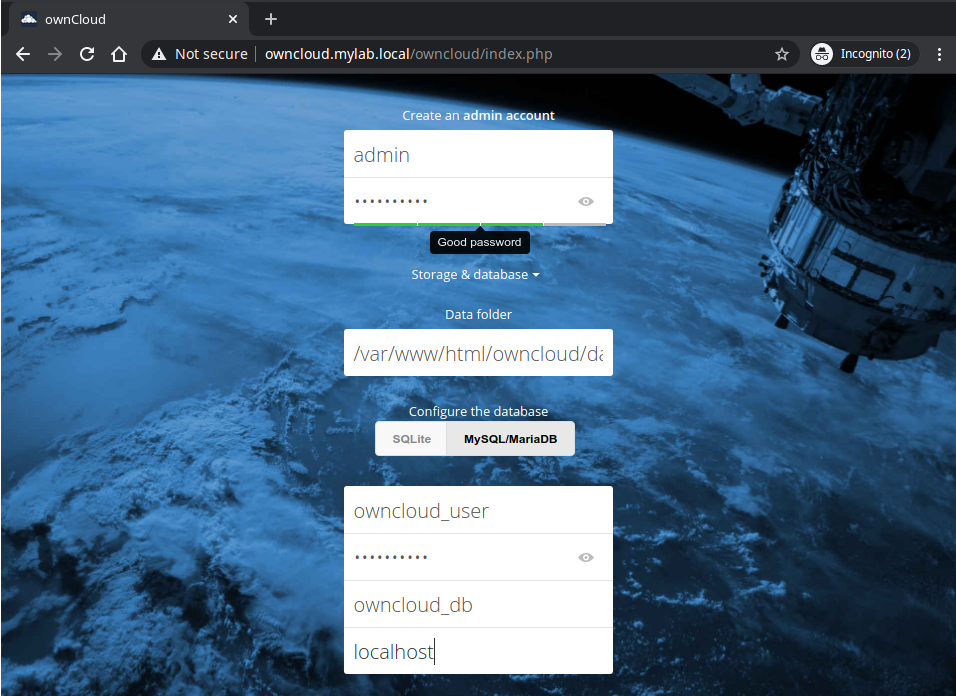
We should be now ready to proceed with the product configuration through the web interface at http://onwcloud_ip/owncloud/.
See Also
comments powered by Disqus